You don't need to install anything to start using the DayPilot component. Just reference the assembly in your project. It's also possible to add the DayPilot to your Visual Studio Toolbox so you drag the component onto your web form and set the properties visually.
Adding the component to the Visual Studio Toolbox:
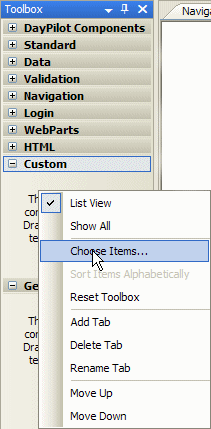
1. Right-click the toolbox and select "Choose Items...".
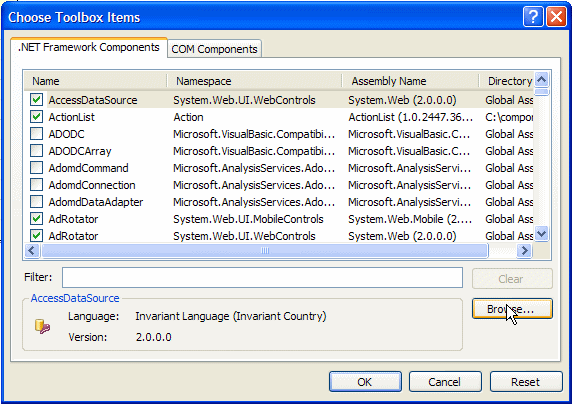
2. In the "Choose Toolbox Items" dialog click "Browse...".
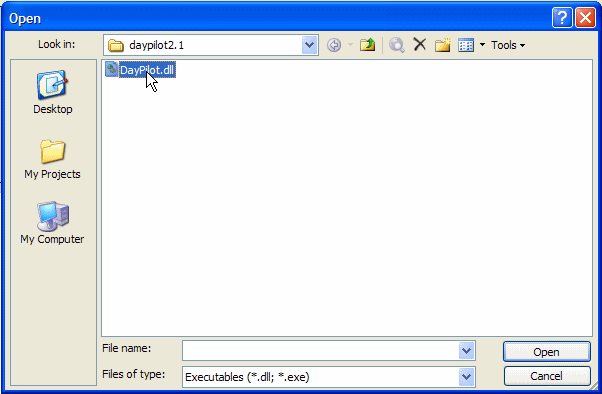
2. Find the DayPilot assembly and click OK.
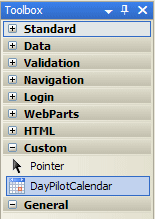
3. Close the "Choose Toolbox Items" dialog by clicking "OK" and you will see the DayPilot icon in the toolbox:
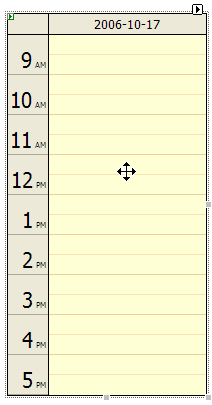
4. Now you can drag the icon to your WebForm and you will see the DayPilot object:
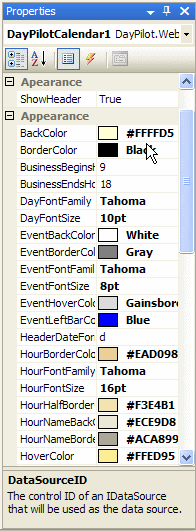
5. You can set the DayPilot properties in the "Properties" window:
The only required step to make DayPilot working is to bind it to a data source. You can either set DataSource property directly or use DataSourceID.
Let's have a following table:
| ID | Name | Start | End |
|---|---|---|---|
| 1 | Lunch | 2006-06-01 12:00:00 | 2006-06-01 12:30:00 |
| 2 | Dinner | 2006-06-01 19:00:00 | 2006-06-01 21:00:00 |
| 3 | Sleep | 2006-06-01 22:00:00 | 2006-06-02 07:00:00 |
| 4 | Breakfest | 2006-06-02 07:30:00 | 2006-06-02 08:30:00 |
In order to show the events in DayPilot calendar you have to do the following steps:
After loading a DataTable from a database (or other source) you should assign it to the DayPilotCalendar.DataSource property:
DayPilotCalendar1.DataSource = MyDataTable;
In our example we are building the DataTable by hand:
DataTable dt;
dt= new DataTable();
dt.Columns.Add("start", typeof(DateTime));
dt.Columns.Add("end", typeof(DateTime));
dt.Columns.Add("name", typeof(string));
dt.Columns.Add("id", typeof(string));

DataRow dr;

dr = dt.NewRow();
dr["id"] = 0;
dr["start"] = Convert.ToDateTime("15:30").AddDays(1);
dr["end"] = Convert.ToDateTime("16:30").AddDays(1);
dr["name"] = "Partner conf. call";
dt.Rows.Add(dr);

// ...

return dt;
When loading the events from a database I recommend limiting the SELECT so only the necessary events are loaded (not all events from the table). DayPilot will work properly in both cases (it only select the relevant events) but all the events will have to be loaded and they will be stored in the ViewState.
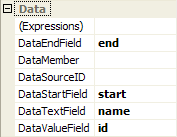
You need to indicate which columns contain the necessary data:
DayPilotCalendar1.DataStartField = "start";
DayPilotCalendar1.DataEndField = "end";
DayPilotCalendar1.DataTextField = "name";
DayPilotCalendar1.DataValueField = "id";
You can also set these properties in the visual designer:
Let's say we want to show just a single day:
DayPilotCalendar1.StartDate = Convert.ToDateTime("1 June 2006"); But we can show multiple days as well. This is a new feature of DayPilot 2.0.
DayPilotCalendar1.StartDate = Convert.ToDateTime("1 June 2006");
DayPilotCalendar1.Days = 5;
Example:
Bind the data in the Page_Load() method:
if (!IsPostBack)
	DataBind();
Here are the data-related properties of DayPilotCalendar:
| Property | Description | Type | Default value |
|---|---|---|---|
| DataSource | Source of event data. | IListSource, IEnumerable, or IDataSource (including DataSet, DataTable, DataView, ArrayList) | null |
| DataSourceID | Id of data source component. | string | null |
| DataStartField | Name of the data source column that contains the event start date and time. | string | null |
| DataEndField | Name of the data source column that contains the event end date and time. | string | null |
| DataTextField | Name of the data source column that contains the event name. | string | null |
| DataValueField | Name of the data source column that contains the event ID. The Id will be passed to the event handling code when clicking on the event. | string | null |
| StartDate | The first date that should be shown by the calendar. | DateTime | DateTime.Today |
| Days | The number of days to be shown. Minimum is 1 and maximum 21. | int | 1 |
For switching the date you can use the standard .NET Framework control System.Web.UI.WebControls.Calendar. You can use the PostBack event to change the DayPilot StartDate and Days properties.
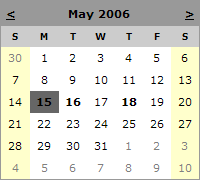
In our sample we will use the DayRender event to improve the calendar:
private void Calendar1_DayRender(object sender, System.Web.UI.WebControls.DayRenderEventArgs e)
{
	string fontWeight = "normal";
	if (isThereEvent(e.Day.Date))
		fontWeight = "bold";

	string color = "black";
	if (e.Day.IsOtherMonth)
		color = this.Calendar1.OtherMonthDayStyle.ForeColor.Name;

	e.Cell.Text = String.Format("<a href='Default.aspx?day={0:d}' style='color: "
		+ color + ";text-decoration:none; font-weight:"
		+ fontWeight + "'>{1}</a>", e.Day.Date, e.Day.Date.Day);
}
The method isThereEvent() returns true if a specific day contains any event. This method will be specific to your application. You can go through the data returned from the database (and supplied to DayPilotCalendar.DataSource) to avoid another database request. We are not using the database in our sample so it is hard-coded:
private bool isThereEvent(DateTime date)
{
	DateTime today = DateTime.Now;
	DateTime tomorrow = today.AddDays(1);
	DateTime anotherDay = today.AddDays(3);

	// there are events today
	if ((date.DayOfYear == today.DayOfYear) && (date.Year == today.Year))
		return true;

	// there are events tomorrow
	if ((date.DayOfYear == tomorrow.DayOfYear) && (date.Year == tomorrow.Year))
		return true;

	// there are events on another day
	if ((date.DayOfYear == anotherDay.DayOfYear) && (date.Year == anotherDay.Year))
		return true;

	return false;
}There are many options to change the default appearance:
| Property | Description | Type | Default value |
|---|---|---|---|
| BackColor | Background color of a standard hour cell (business hours). | Color | #FFFFD5 |
| BorderColor | Color of the calendar border. | Color | #000000 |
| DayFontFamily | Font of the day header. | string | Tahoma |
| DayFontSize | Size of the day header. | Unit | 10pt |
| EventBackColor | Background color of an event. | Color | #FFFFFF |
| EventBorderColor | Color of the event border. | Color | #808080 |
| EventFontFamily | Font of the event text. | string | Tahoma |
| EventFontSize | Size of the event text. | Unit | 8pt |
| EventHoverColor | Background color of an event when the cursors hovers over it. | Color | #DCDCDC |
| EventLeftBarColor | Color of the bar on the left side of an event. | Color | #0000FF |
| HourBorderColor | Color of the border between two the last half in an hour and the following hour. | Color | #EAD098 |
| HourFontFamily | Font of the hour name. | string | Tahoma |
| HourFontSize | Size of the hour name. | Unit | 16pt |
| HourHalfBorderColor | Color of the border between the first and the second half in an hour. | Color | #F3E4B1 |
| HourNameBackColor | Backround color of the hour name. | Color | #ECE9D8 |
| HourNameBorderColor | Color of the border between hour names (vertical separator). | Color | #ACA899 |
| HoverColor | Background color of an hour cell when the cursor hovers over it. | Color | #FFED95 |
| NonBusinessBackColor | Background color of a non-business hour cell. | Color | #FFF4BC |
| HourHeight | Hour height in pixels. Minimum is 30. It must be even. | int | 40 |
| HourWidth | Width of the hour name in pixels. | int | 40 |
| BusinessBeginsHour | Hour when the business hours start. | int | 9 |
| BusinessEndsHour | Hour when the business hours end. | int | 18 |
| NonBusinessHours | Determines whether the non-business hours should be visible (if there is no event). | NonBusinessHoursBehavior | NonBusinessHoursBehavior.HideIfPossible |
| ShowHours | Determines whether the hour names column should be visible. | bool | true |
| TimeFormat | The time format - 12-hours cycle (3 PM) or 24-hours cycle (15:00). | TimeFormat | TimeFormat.Clock12Hours |
| Width | Width of the control. | Unit | null |
DayPilot Lite supports two user actions:
The actions can be handled on the client (by custom JavaScript code) or on the server (by handling the server event).
| Property | Description | Type | Default value |
|---|---|---|---|
| EventClickHandling | Handling of a click on a calendar event. | EventClickHandlingEnum | EventClickHandlingEnum.JavaScript |
| TimeRangeSelectedHandling | Handling of a click on a free-time slot. | TimeRangeSelectedHandling | TimeRangeSelectedHandling.JavaScript |
| EventClickJavaScript | JavaScript code that should be executed when the user clicks on a calendar event (provided that EventClickHandling is set to JavaScript). The string "{0}" will be replaced with an event ID. | string | "alert('{0}');" |
| TimeRangeSelectedJavaScript | JavaScript code that should be executed when the user clicks on a free-time slot (provided that TimeRangeSelectedHandling is set to JavaScript). The string "{0}" will be replaced with the date and time specified in the standard format produced by DateTime.ToString("s") - e.g. "2006-05-15T07:00:00". | string | "alert('{0}');" |
For more about server-side event handling see Server-side event handling.
The typical action for clicking a free time slot will be creating a new event. You can use the following JavaScript code to redirect the user to a page with new event details:
Set TimeRangeSelectedJavaScript to "document.location='NewEvent.aspx?startingtime={0}';"
In the NewEvent.aspx take the Request.QueryString["startingtime"] value and convert it to DateTime:
DateTime startingTime;
if (Request.QueryString["startingtime"] != null)
  startingTime = Convert.ToDateTime(Request.QueryString["startingtime"]);
Then you can use the value to prefill a form with date and time specification.
| Event | Description |
|---|---|
| EventClick | Occurs when the user clicks on an event and EventClickHandling property is set to PostBack. |
| TimeRangeSelected | Occurs when the user clicks on an event and TimeRangeSelectedHandling property is set to PostBack. |
Your server-side event handling methods will get the important data:
The e argument of EventClick handler (EventClickEventArgs) holds is the value of the clicked event (DataValueField) in e.Value.
protected void DayPilotCalendar1_EventClick(object sender, EventClickEventArgs e)
{
  Label1.Text = "Selected event: " + e.Value;
}protected void DayPilotCalendar1_TimeRangeSelected(object sender, TimeRangeSelectedEventArgs e)
{
Label1.Text = "Selected time: " + e.Start;
}The DayFormat property specifies the DateTime format to be used for day headers. It accepts the same string as DateTime.ToString(string).
Here are the examples for EN-US locale:
| DayFormat value | Sample header |
|---|---|
| "d" | 6/5/2006 |
| "D" | Monday, June 5, 2006 |
| "m" or "M" | June 5 |
| DayFormat value | Sample header |
|---|---|
| "dddd" | Monday |
| "ddd" | Mo |
| "dd" | 05 |
| "%d" | 5 |
| "M/dd" | 6/05 |
| "M/d" | 6/5 |
| "MM/dd" | 06/05 |
| "d MMMM yyyy" | 5 June 2006 |
| "yyyy-MM-dd" | 2006-06-05 |